Pengelana

  • 5 days ago
  • Joined 25 days ago
  • 0 discussions
  • 1 post
  • 0 best answers
  • 0 Followed0 Followers
  • And the winners are…

    @tumbeliina, @GordonMcConnell and @shubhamsri100 🎉

    Thank you everyone for participating! Winners, please send me a direct message here on nothing.community to claim your prize. You must contact me within 48 hours from now otherwise your prize will be rolled down to another winner. 🙂

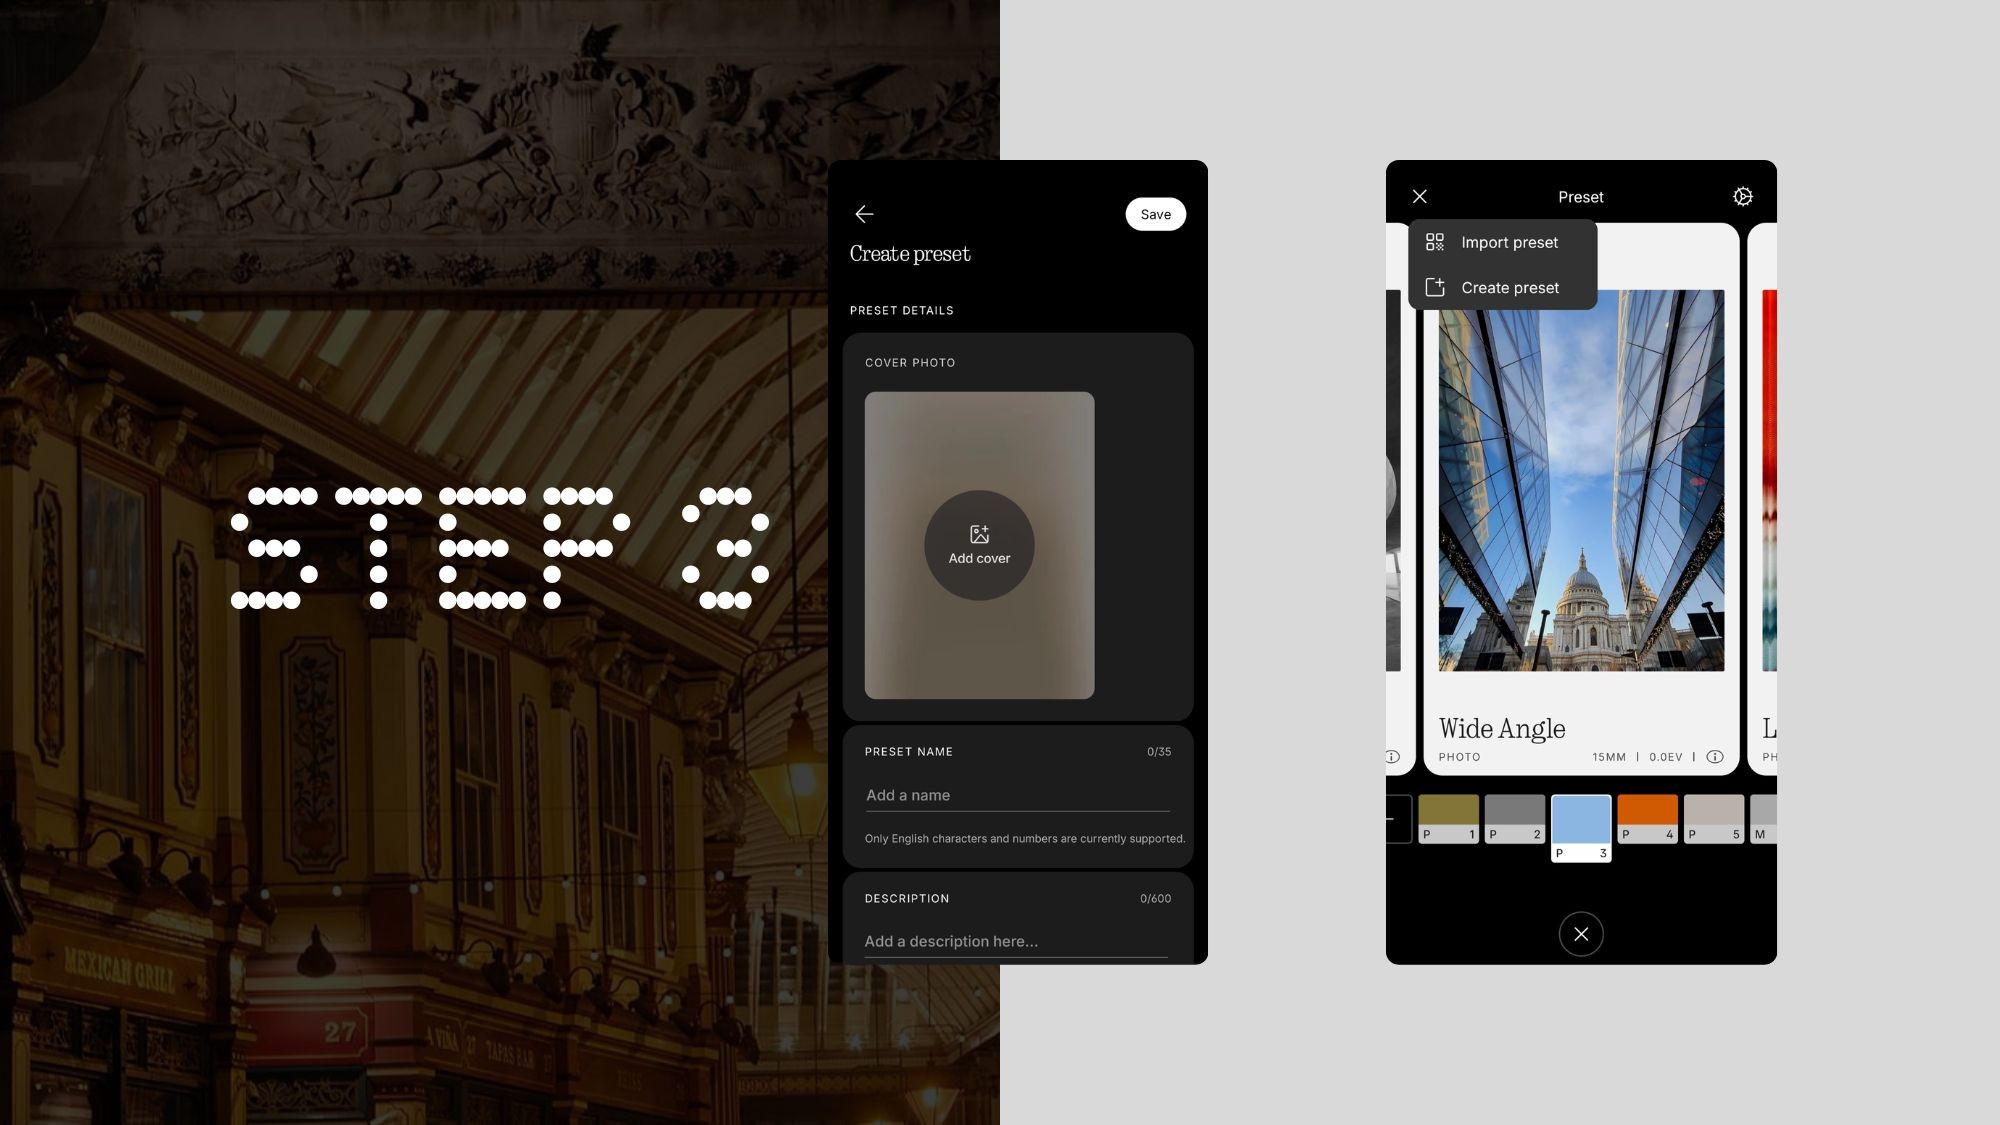
    • With the Phone (3a) series, we introduced Camera Presets, a powerful feature that gives you greater creative control over how your photos and videos look straight from the Camera app. Unlike traditional post-processing, which requires applying colour grades after capturing an image, Camera Presets allow you to see the final look in real time as you shoot.

      As of now, camera presets are exclusive to the Phone (3a) series, but they will be coming to older Nothing devices in the future. Since this feature needs to be tuned differently for each device’s camera setup, additional time and optimisation are required.

      Colour grading is one of the most time-consuming aspects of professional photography and filmmaking. With presets and custom filters (LUTs), you can instantly achieve a cinematic, natural, or vintage look without needing external software. Whether you are a content creator, filmmaker, or just someone who wants to add a unique touch to their shots, Camera Presets allow you to capture exactly the mood and aesthetic you want before you even press the shutter button.

      LUTs (Look-Up Tables) enhance the colours of your photos by applying predefined colour transformations. They allow you to achieve a cinematic effect, simulate different styles and lighting conditions, and refine your shots with professional-grade adjustments. Whether you want a bold, dramatic look or a subtle enhancement, LUTs provide instant control over your photo’s final appearance.

      This guide will take you through everything, including what Camera Presets are, how to create them, how to import them into Nothing Camera, and how to optimise them for the best results.

      Why Camera Presets Matter

      Before diving into how to create and use Camera Presets, it is important to understand why they matter.

      1. Real-Time Colour Grading

      Traditionally, professional photographers and filmmakers shoot in flat colour profiles like RAW or LOG and then spend hours grading footage in software like Adobe Lightroom, Photoshop, or DaVinci Resolve. Camera Presets eliminate this extra step, allowing you to apply colour grading directly in the Camera app, saving time and ensuring consistency across your shots.

      2. Consistency in Style

      If you are a content creator or someone who wants a consistent aesthetic across all their shots, Camera Presets let you maintain the same look across different environments. Whether you are shooting in bright daylight or dim indoor settings, applying a preset ensures your content looks uniform and polished.

      3. No Post-Processing Required

      Not everyone has the time or skills to manually colour grade their photos and videos. Camera Presets allow you to capture professional-looking shots instantly without needing to edit them later.

      4. Designed for Performance

      Nothing Camera is optimised to apply LUTs in real time without adding extra processing lag. Unlike third-party camera apps that apply LUTs after capture, Nothing’s Camera Presets ensure you see the final result in the viewfinder before you take the shot.

      Save, Switch, and Share Camera Presets

      Create unique photo styles by using the full range of camera features and then switch easily between them. Share with others or grab ones that interest you using QR codes.

      Step 1: Creating a Filter (LUT) for Nothing Camera

      A LUT is a colour transformation profile that maps one set of colours to another. This allows you to apply a specific look to your photos and videos without affecting the original image quality:

      Method 1: Photoshop (Fast and Easy)

      1. Open Photoshop and import an image with a variety of colours.

      2. Apply your colour grading using:

      • Curves

      • Hue/Saturation

      • Colour Balance

      • Selective Colour

      3. Go to File > Export > Color Lookup Tables.

      4. Select the .CUBE format and save the file.

      You now have a .CUBE LUT file ready to import into Nothing Camera.

      Method 2: Online LUT Generators (No Software Required)

      1. Visit a LUT generator platform like:

      • Lutify.me

      • IWLTBAP LUT Generator

      • 3DLUT Creator

      2. Upload a reference image.

      3. Apply colour grading using available tools.

      4. Export and save your LUT as a .CUBE file.

      You can now use this LUT with the Nothing Camera.

      Method 3: Lightroom (Requires Extra Steps)

      1. Edit an image in Lightroom with your desired colour grading.

      2. Export both the original and edited versions.

      3. Use IWLTBAP LUT Generator to compare both images and generate a .CUBE file.

      This workflow bridges Lightroom edits into a LUT format that works with Nothing Camera.

      Method 4: DaVinci Resolve (For Professional Colourists)

      1. Open DaVinci Resolve and import a clip or image into the timeline.

      2. Go to the Color tab and begin grading using nodes, apply adjustments like:

      • Lift, Gamma, Gain

      • Contrast, Pivot

      • Curves, Hue vs Hue/Sat/Lum

      • Any other colour corrections

      3. Once satisfied with the grade, right-click on the thumbnail in the gallery and choose “Generate 3D LUT (33 Point Cube).”

      4. Save the .CUBE file to your computer.

      This .CUBE file can now be imported into Nothing Camera like any other LUT. DaVinci Resolve is especially powerful for nuanced colour grading and allows for highly custom presets for cinematic looks.

      Step 2: Importing LUTs into Nothing Camera

      Once you have your .CUBE file, importing it into Nothing Camera is simple:

      1. Open the Camera app and go to Filters.

      2. Tap Import LUT and select the .CUBE file.

      3. The LUT will now appear as a custom filter you can apply in real time.

      This lets you see the colour grading live in the viewfinder, removing the need for post-processing.

      Step 3: Creating Custom Presets in Nothing Camera

      Once imported, you can fine-tune LUTs and save them as presets for instant access:

      1. Select the imported LUT in the create preset section.

      2. Adjust modes, focal length, exposure, and other advanced settings to your liking.

      3. Add a cover photo, name, and description, then tap Save as Preset so it is always ready to use.

      Presets can also be created using built-in Nothing Camera filters, meaning you do not always need a .CUBE file. You can tweak an existing filter and save it as a custom preset.

      Optimising Presets for the Best Results

      Test in Different Lighting Conditions: A LUT that looks great outdoors may look unnatural indoors. Test your presets in different lighting conditions to ensure consistency.

      Adjust Exposure Before Applying LUTs: Some LUTs are designed for flat, low-contrast photos. If your LUT looks too dark or oversaturated, tweak the exposure before applying it.

      Avoid Colour Banding: Extreme LUT adjustments may cause banding in skies and shadows. Use subtle LUTs for the best results.

      Step 4: Sharing Presets with the Nothing Community

      Once you have created a preset, sharing it is easy:

      • Generate a preset card in the Camera app by clicking on share.

      • Share the preset card with a QR code, allowing others to scan and import it instantly.

      Here are some personal presets I made. Try them out by scanning the preset cards below:

      More to Explore

      With custom LUTs and presets, you have complete control over how your photos and videos look before you even press the shutter button. Whether you want a cinematic profile, a vintage film tone, or a bold and vibrant preset, this feature lets you define your own visual style.

      Try it out, experiment with different LUTs, and share your best presets with the community. If you have created something worth sharing, let us know. We would love to see what you come up with.

      This post marks the start of a thread where we can share our presets and the stories behind them. Let’s build a space where creativity thrives, and everyone can contribute their unique styles to inspire others.

      • We’re back once more for a peek at the internals of our latest smartphone! Phone (3a) Series brings a host of upgrades over the Phone (2a) Plus, so what better way to visualise those than to lift the lid and see some of that new hardware. In this post, I’m digging into Phone (3a) Pro in Grey.

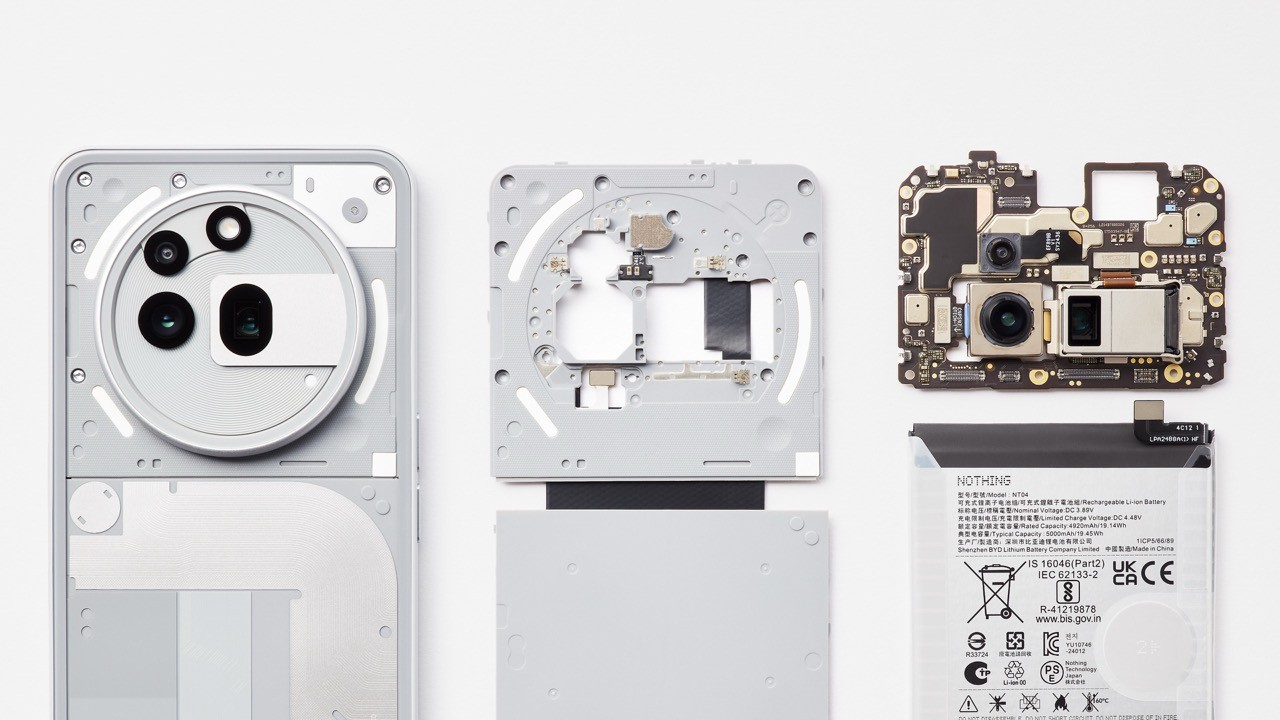
        As you probably already know, smartphones are built in layers, almost like a sandwich, so let’s look at the 3 biggest components before focussing in on the internals that fit between them.

        🔴 Display
        On the front of (3a) Series you’ll find a FHD+ AMOLED flexible LTPS display. At 6.77” this is our largest to date, delivering a 91.43% screen-to-body ratio.

        With an adaptive 120hz refresh rate for smooth scrolling and a 1000 Hz touch sampling rate (+316% faster than (2a) Plus), Phone (3a) Pro brings near instant responsiveness when gaming. There are improvements to brightness too, with 3000 nits peak, (3a)'s display is up to +131% brighter compared to (2a) Plus.

        Just like the (2a) Plus display, you can see that the rear of the screen features a large heat spreading copper surface. Near the top you’ll spot the selfie camera and proximity sensor cutouts and the slanted square cutout near the bottom is for the in-display fingerprint sensor to see through.

        The long black flexible printed circuit (FPC) is how our screen receives a display signal; it trails to the top of the device via a hole in the midframe and connects to the motherboard.

        🔵 Midframe
        On (3a) Pro, the midframe and buttons are produced using 100% recycled aluminium, a more premium material that is equally elegant and durable. As with our (2a) Series, (3a) devices have antennas embedded around the midframe to ensure great reception. In addition, (3a) Series features an additional high-performance gaming antenna in the middle of the frame. This means that when holding horizontally for gaming, the signal won’t be blocked by your hands, ensuring stable and smooth gaming network connectivity. Compared to the (2a) Plus this improvement can reduce lag by over 50% when using a mobile network.

        The big rectangular space in the middle of the midframe is for our 5000mAh battery, with the space above perfectly shaped to house the motherboard. The long, thin space at the bottom is where the daughterboard sits, along with the speaker, optical fingerprint reader and SIM tray.

        🟡 Rear Cover
        The premium materials found on the midframe continue onto the rear of Phone (3a) Pro where we find a 2.5D rear glass panel, a significant change from the plastics used on our (2a) devices. Integrated at the top is the housing for our triple rear camera system along with the LED flash - let’s zoom in a little closer to this part, there’s lots to see…


        Above, we get a great look at the space inside the camera bump of (3a) Pro. The lenses of each camera are positioned as close together as possible and positioned precisely to ensure a smooth transition between them when you’re zooming in and out. At the very top is a small diffused aperture for the flash LED to fire through. Speaking of cameras, we have some macro shots of the sensors themselves:


        Phone (3a) Pro Camera System
        (3a) Pro hosts our best camera system to date, featuring a versatile array of lenses for portraits, macro, long zoom shots and more - it’s super versatile. Paired with our new Camera app which enables sharable, Personal Presets and even allows for the use of LUTs via the .Cube format, there’s infinite possibilities to explore. Take a look at some of our recent community reviews from Palmix, Juse and Bubi for some example images.


        ‎ ‎
        🟡 Primary - 50 MP Samsung, f/1.88, 1/1.56” sensor, 84.5° FOV, OIS & EIS
        🔵 Ultra Wide - 8 MP Sony, f/2.2, ¼″ sensor, 120° FOV
        🟢 Periscope Zoom - 50MP Sony, f/2.55, 1/1.95” sensor, 33.6° FOV, OIS & EIS
        🔴 Front - 50 MP Samsung, f/2.2, ½.76″ sensor, 81.2° FOV

        Phone (3a) Pro Periscope:
        (3a) Pro features a flagship periscope zoom, a first for any Nothing smartphone. A prism, paired with a horizontally stacked lens assembly, is able to offer 3x optical zoom and up to 60x ultra zoom. In the above image, you can see how much larger this component is compared to a regular camera module - our teams worked hard to implement these segment-leading zoom capabilities with the least possible impact on overall device thickness.

        🔴 Prism - reflects light towards the lens assembly and shifts to deliver OIS
        🟡 Stacked assembly of 4 lens elements - directs light to the sensor and shifts to attain focus
        🔵 Sony LYTIA 600 sensor - turns light into a digital signal which informs the image


        BTS image showing the periscope alongside (3a) Pro’s camera system housing


        (3a) Series Chipset

        We heard our customers asking us to bring a Snapdragon chip to our midrange lineup, so for (3a) Series, we used the 7s Gen 3. A powerful chip that can handle gaming or multitasking with up to 33% faster CPU and 11% graphics improvement compared to (2a). It’s also more efficient, meaning there’s an overall improvement in battery life.

        We’ve cropped in to the motherboard in the image above, as a bonus, you can see the proximity and ambient light sensors at the very top, helping to illustrate where these chips sit within the device. Shoutout to our photographer David Wilman for removing all of the thermal material so we can get a good look at these components in all their glory!

        🔴 Snapdragon 7s Gen 3 5G (SD7635) - Up to 2.5 Ghz built on TSMC’s 4nm process.

        • 8-cores: 1× 2.5GHz (Cortex-A720), 3× 2.4GHz (Cortex-A720), 4× 1.8GHz (Cortex-A520)

        • GPU: Adreno 810

        • NPU: HTP2

        🔵 UFS2.2- Storage + LPDDR4X RAM - learn more about this in a recent post by @Raymond


        The underside of the Glyph Interface
        And finally, the eagle-eyed fans will have spotted that (3a) Series has had a Glyph update, with an adjusted arrangement, all 3 of the Glyph segments are now addressable, with a total of 36 zones. Below we look at the rear of the top left Glyph (Internal notation: Glyph ‘C’), used for our Glyph Progress feature - counting the dots you’ll find 20 addressable segments for a smooth progress animation.

        We hope you enjoyed diving into Nothing Phone (3a) Pro’s fresh look and internals with us - as always I had a lot of fun peeking inside our latest product to bring a fresh perspective to you all!

        EDIT: Giveaway now closed. Like this post and drop into the comments below and tell us your favourite spec or feature of Phone (3a) Pro for a chance to win one! ⬇️ Click through to view the full entry requirements and giveaway terms and conditions. Entries close April 3, 2025, at 11:00 GMT.

        • The device retains the core idea of interchangeable panels but takes it even further. Accessories remain an essential part of the ecosystem, allowing everyone to create a unique phone tailored to their needs.
          FOR YOU, BY YOU.

          Project link:
          https://www.behance.net/gallery/221809451/CMF-Phone-2

          P.S. Yesterday, I posted on X, and that’s where I got invited here. But you can also check it out there: